Winter Riding Retrospective
Tagged: bike diy opinion winterThis is a continuation of The Winter Huffy Build.
My first winter of riding a bike was a roaring success. I can proudly (and with much hubris) say that I never wiped out or had an accident, though I definitely had my fair share of moments where I lost traction. To that end, I’d like to give my own list of advice for anyone who wants to ride in the winter.
Tips for Winter Riding
- Go Slow. However slow you think you need to go, go a little bit slower.
- Slower than that.
- Go extra slow when turning. If you have studded tires, they’re great for traction when you’re moving in a straight line, but you will still slip if you try to take a corner at speed.
- Everything can be avoided if you go slow enough.
- Always be prepared to lose traction. Become familiar with the feeling of your front and rear tire slipping, and learn to control your skid. It’s not that different from driving a car in winter.
- If you have studded tires, they help a lot on solid ice. But they don’t help with filthy, gritty slush. Tom Babin calls this “mashed potatoes”, and it’s much more of a problem than ice.
- For slush and snow, knobbly mountain bike tires work better than studded tires. A valid compromise is to have a knobbly mountain bike tire on your rear wheel, and a spiked tire on your front wheel.
- Try it for yourself, come to your own conclusions, and figure out your own comfort zone.
- Your hands and feet will get cold. Prepare for this. Use mitts instead of gloves, at the very least.
- But seriously, slow down.
My most spectacular near-miss involved me losing traction when a car turned into the alleyway I was exiting and startled me. Somehow I managed to end up standing while the bike slid out from under me. We both paused for a second; the driver was just as baffled as I was that I was suddenly standing in front of him, holding the bike by one of its handlebars with the tail end of it facing him.
Aside from that, it was all wonderfully uneventful.
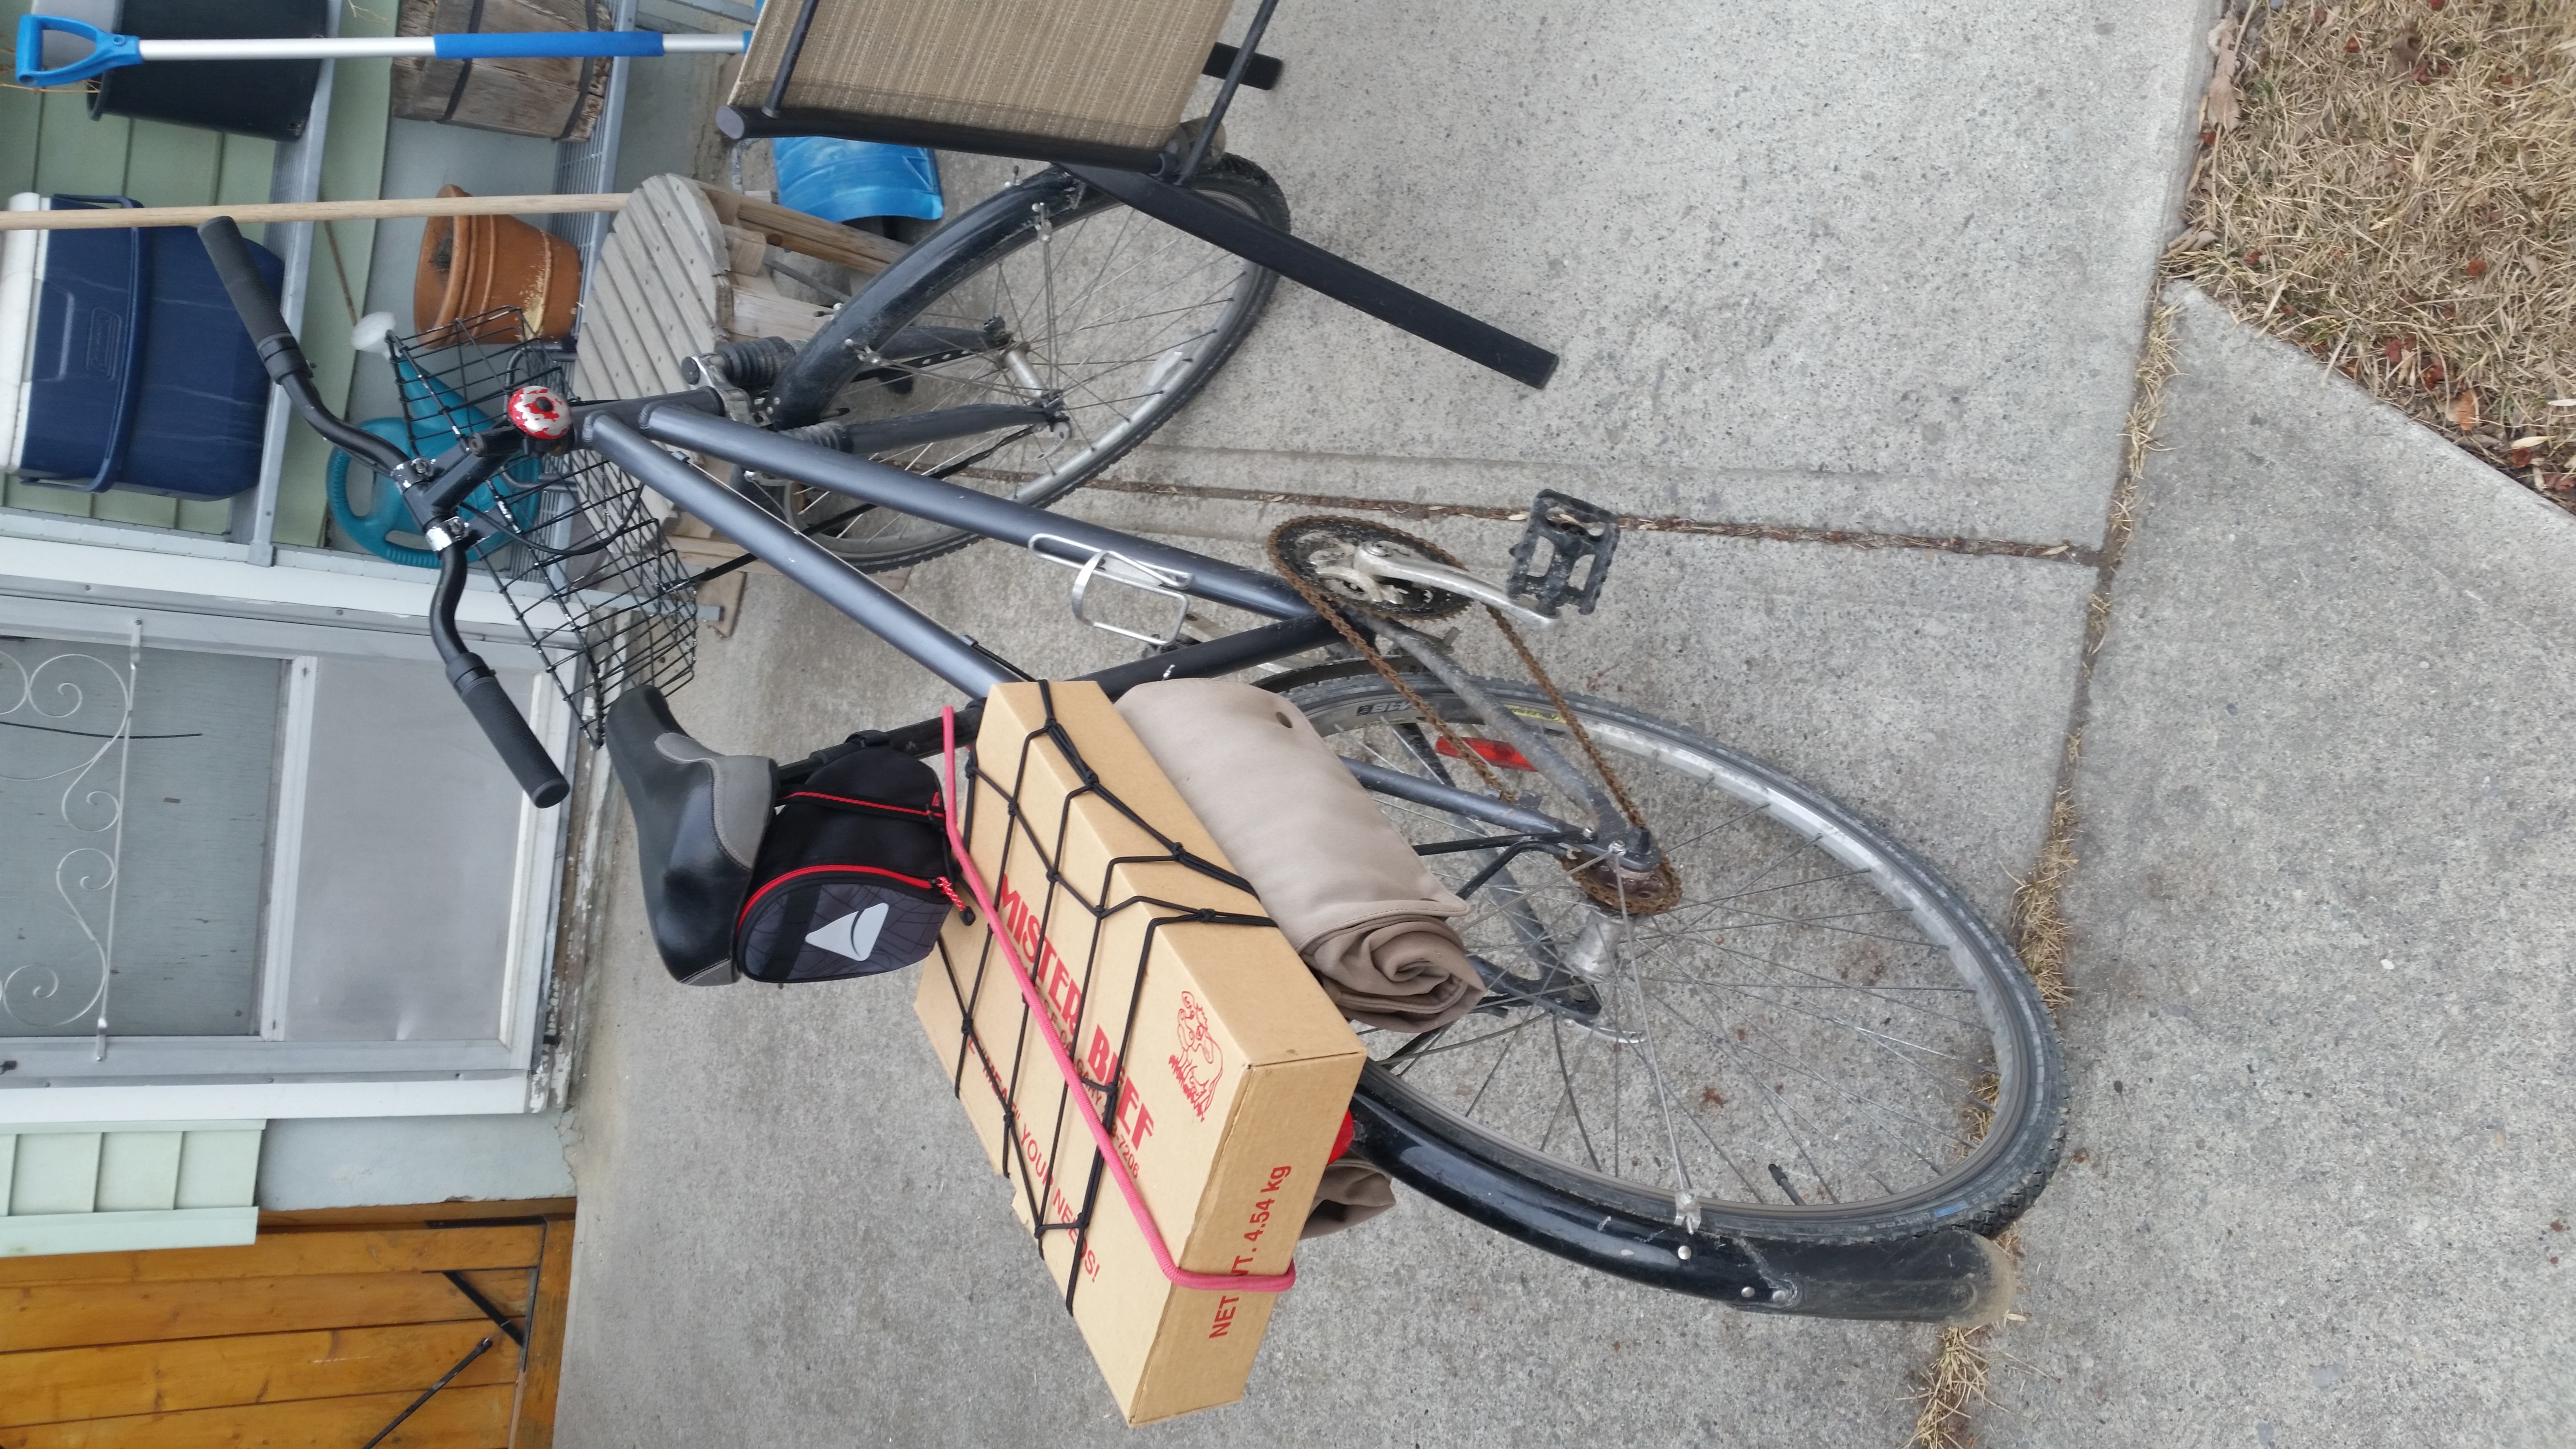
Adventures in carrying cargo
I was very glad I had built the bike with a front basket and rear rack. The bike was my primary mode of transportation after all, which meant that I carried everything from groceries to computers to thrift shop purchases on it. This was doubly useful, since my car’s block heater is nonfunctional, and it won’t start if the temperature is below -20°C.
That was quite a large chunk of the winter, so my bike was, on average, more reliable than my car!
Below are a few examples of things you can carry on a bike. Sometimes they require a bit of creative thinking, but for the most part, you’d be surprised what you can carry with ease.


Managing the Cold
You’d be surprised how easy it is to mitigate cold when you’re on a bike. In fact, I’d say that for short trips I’m probably warmer on my bike than the average person is in their car. The body is its own natural heat source once you get your blood pumping, and it’s easy to get your blood pumping on a bike.
The cold only bothered me in a few ways:
First, windchill. The air temperature might be comfortable, but when you’re on a bike, you’ll lose a lot of heat to airflow. Your hands might be fine without gloves in -10°C weather, but I can guarantee that once the wind is rushing by you on a bike and you’re gripping the handlebars, the heat will drain out of your hands almost immediately. In fact, having an outer layer that protects against wind is probably more important than having insulating layers when you’re on a bike. Make absolutely sure you use mitts or gloves that break the wind. The wind is also a problem for your face. Not only is it painfully cold, it will also totally dry your skin out. I recommend wearing a ski mask when the wind is particularly bad, and otherwise, rub lotion or vaseline on your face to prevent your skin from drying out.
Second, extremities. I have poor circulation, and riding in winter I’d often find that my core is warm to the point where I’m sweating, but my hands and feet are freezing. On extremely cold days, I recommend using some disposable hand warmers.
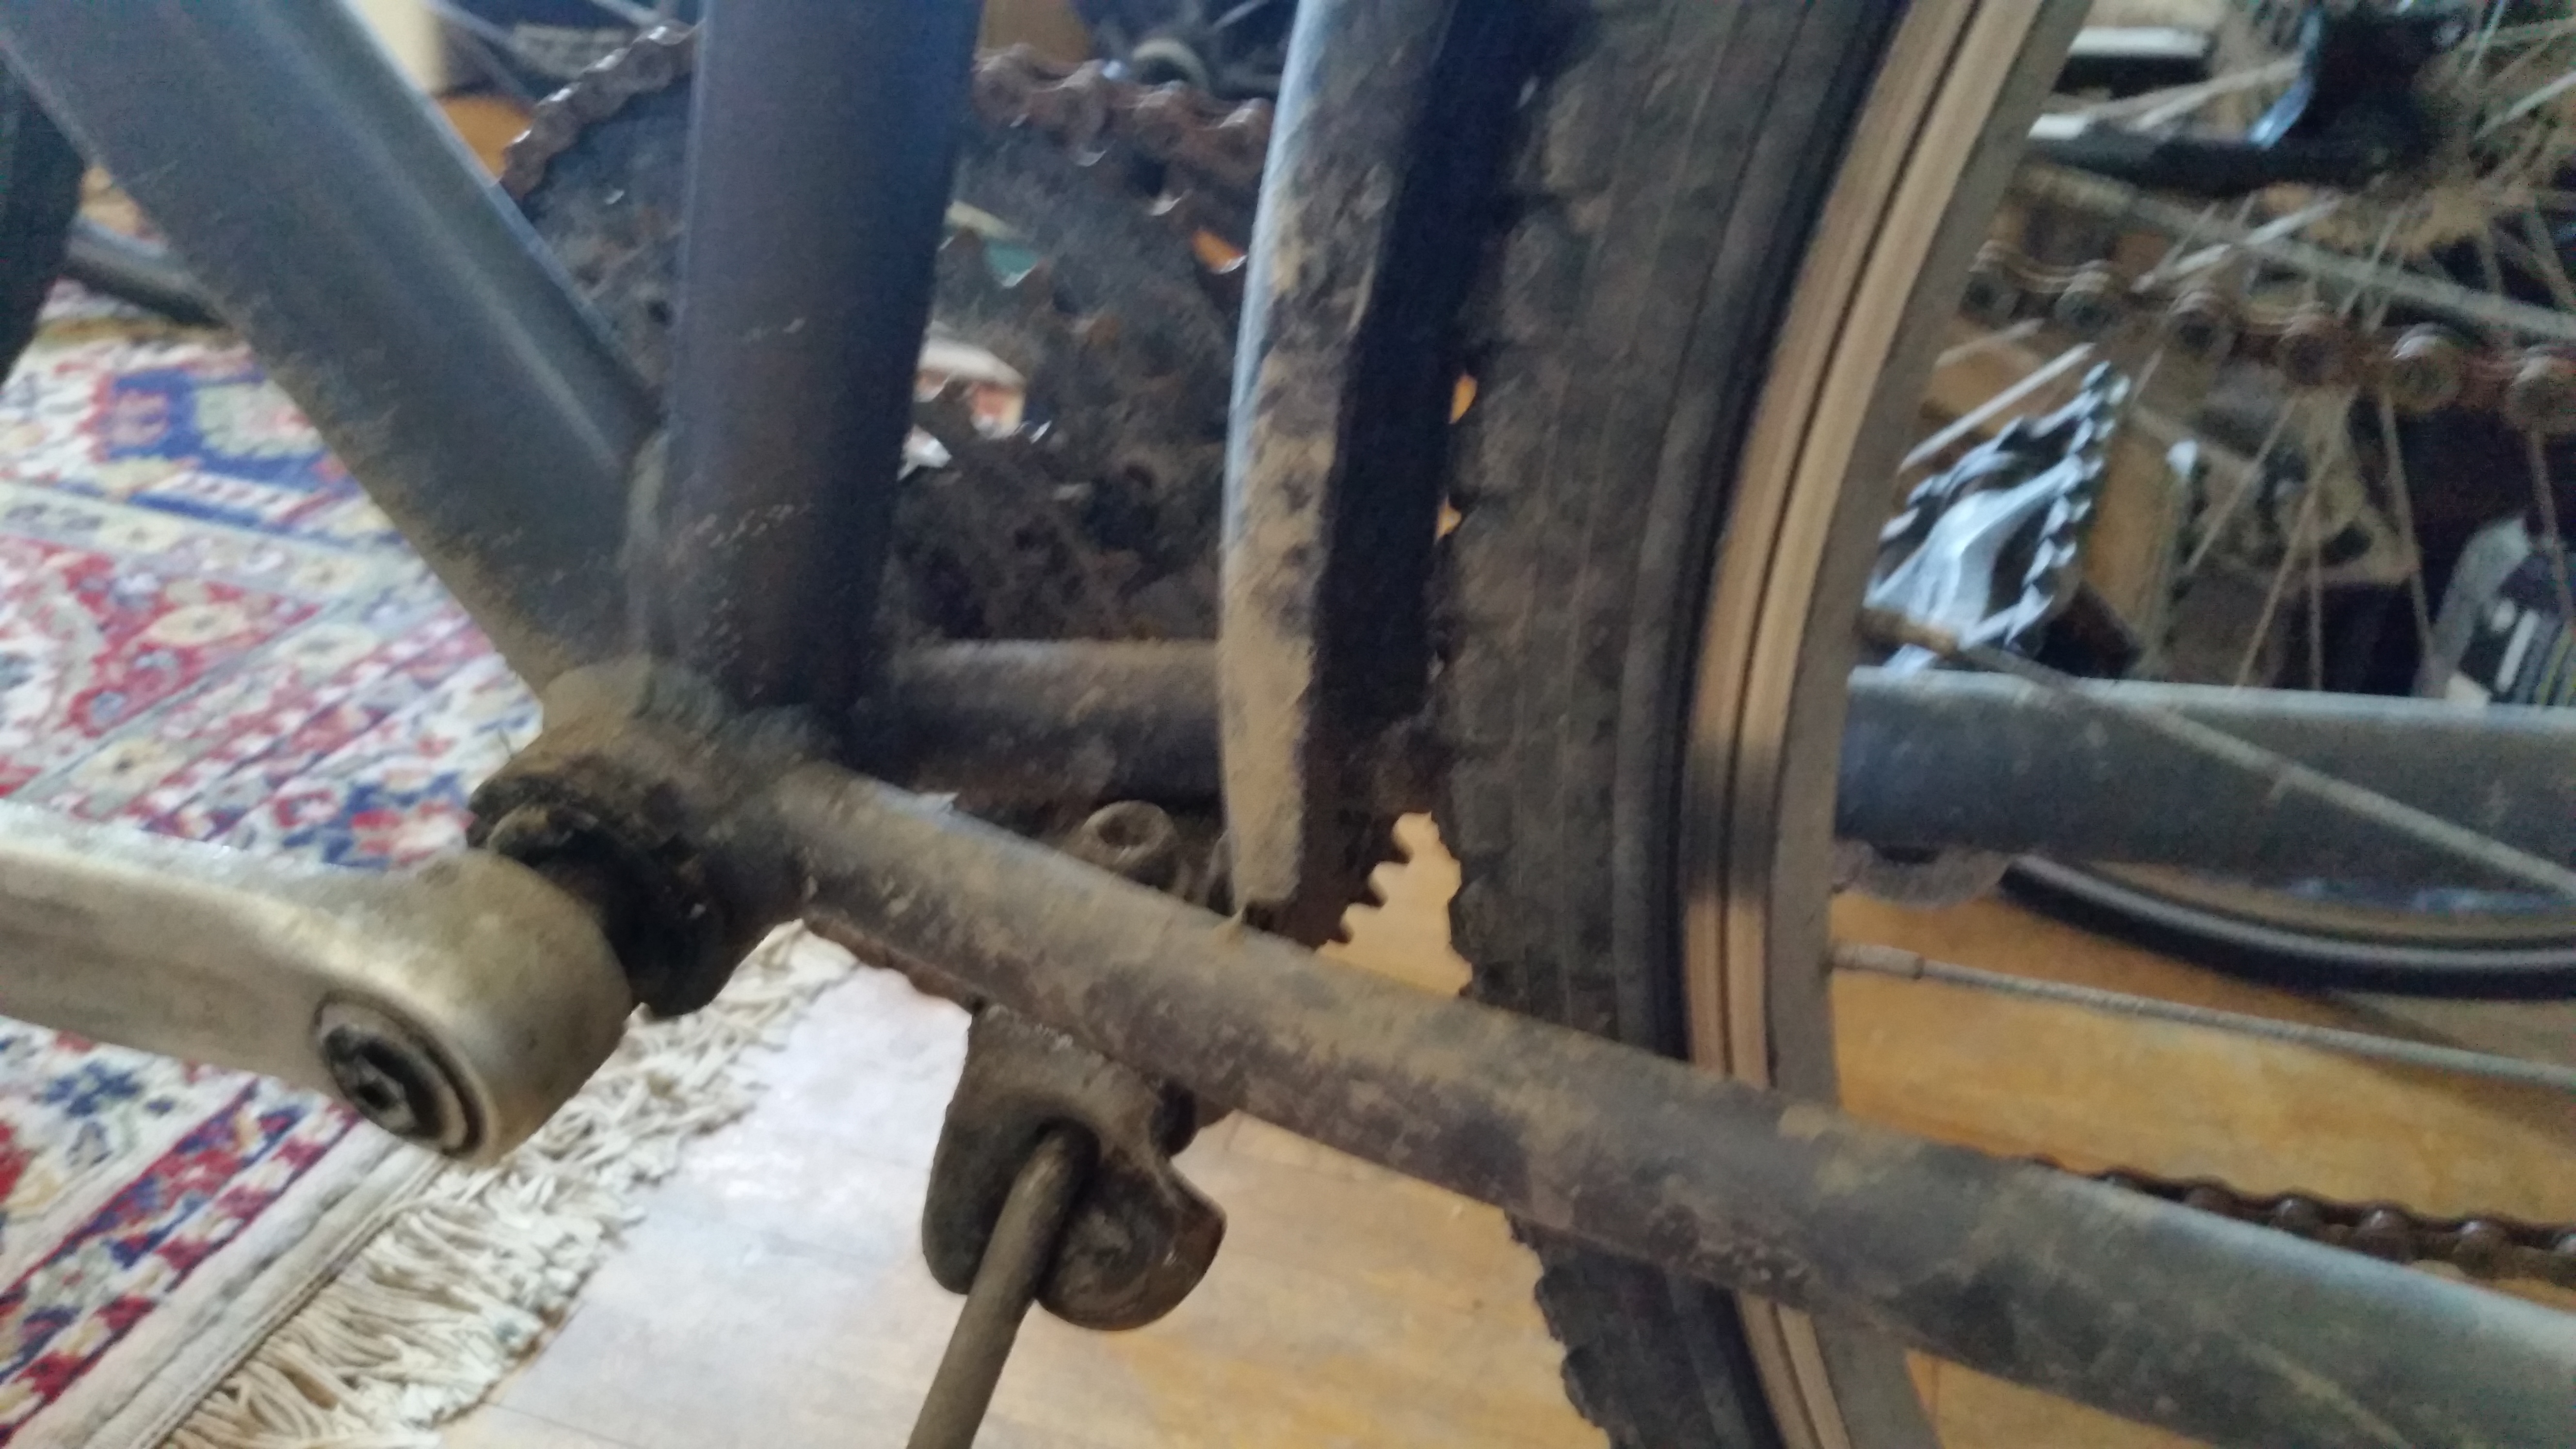
And finally, components. We had a particularly bad cold snap this winter. Taking Windchill into account (which you always should, if you’re cycling), we had a couple days where we reached -40°! That’s the one temperature where celsius and fahrenheit are the same! (Without windchill it was around -36°C). I rode a grand total of maybe 20km in those conditions. Traction was fantastic - no slop to slide on, only hard ice for my studded tires to dig into. But there were some minor mechanical problems. The grease I used when building the bike was Park Tool PPL-1, which is rated to -26°C. It got somewhat tacky in places, resulting in unresponsive braking and stiff turning and pedaling. This was only a minor issue though, the PPL-1 performed pretty admirably at these temperatures. A bigger issue was that whatever grease was used in the freehub and hub assemblies on my wheels was of much lower quality.
Starting the ride at this temperature, my wheels were stiff. There was a lot of resistance when coasting, enough that I’d gradually come to a stop as though I were lightly braking. Thankfully, friction is a thing, and the motion of the wheels heated the hubs up to a temperature where the grease worked as intended.
This wasn’t the case for the freehub assembly! The freehub assembly has a ratcheting mechanism that allows your bike wheel to spin freely without moving the chain. It is what allows your bike to coast. This ratcheting mechanism is internal, and packed in grease, which was obviously not rated for 36 below. I learned this when, after coasting a while, I would go to pedal and encounter no resistance – I’d just spin the cranks and none of that force would be applied to the wheels. If the ratcheting mechanism was frozen and couldn’t re-engage, I couldn’t pedal. The trick was to keep spinning forward until the mechanism slowly re-engaged, and then keep pedaling without coasting, so the freehub couldn’t start ratcheting. Not a huge issue, but I was certainly taken by surprise.
I’d also like to note that the temperature doesn’t stay this cold. In fact, our coldest month here has an (average daily high of -2°C). We usually have only a small handful of days that get below -20°C, so if you’re looking to try winter cycling, don’t let this intimidate you. You can simply skip every day that’s colder than -20, and you’ll only miss out on a couple weeks of cycling. Snow is a similar story - it doesn’t snow every day here, and you can easily just choose not to cycle for a day or so after a big snowfall. Most routes will be plowed by then.
Don’t let these extremes intimidate you - they’re really only a few days a year! They’re fully optional, even for a winter cyclist.
Disassembly and Investigating the Damages
The people who wrote articles about winter cycling weren’t kidding about the damage it does to your bike. Doubly so if you’re like me and have to store the bike outside. Any advice like “Make sure to wash your bike off after riding” is useless if you don’t have a heated garage. If I took hot water out to rinse my bike, I’d come back to find it completely frozen (and likely damaged). I probably lubed up my chain three times over the course of the winter, and in retrospect I should probably have done much more. That’s a topic I’ll have to research for next year - finding the right lubricant and weatherproofing a bike chain.


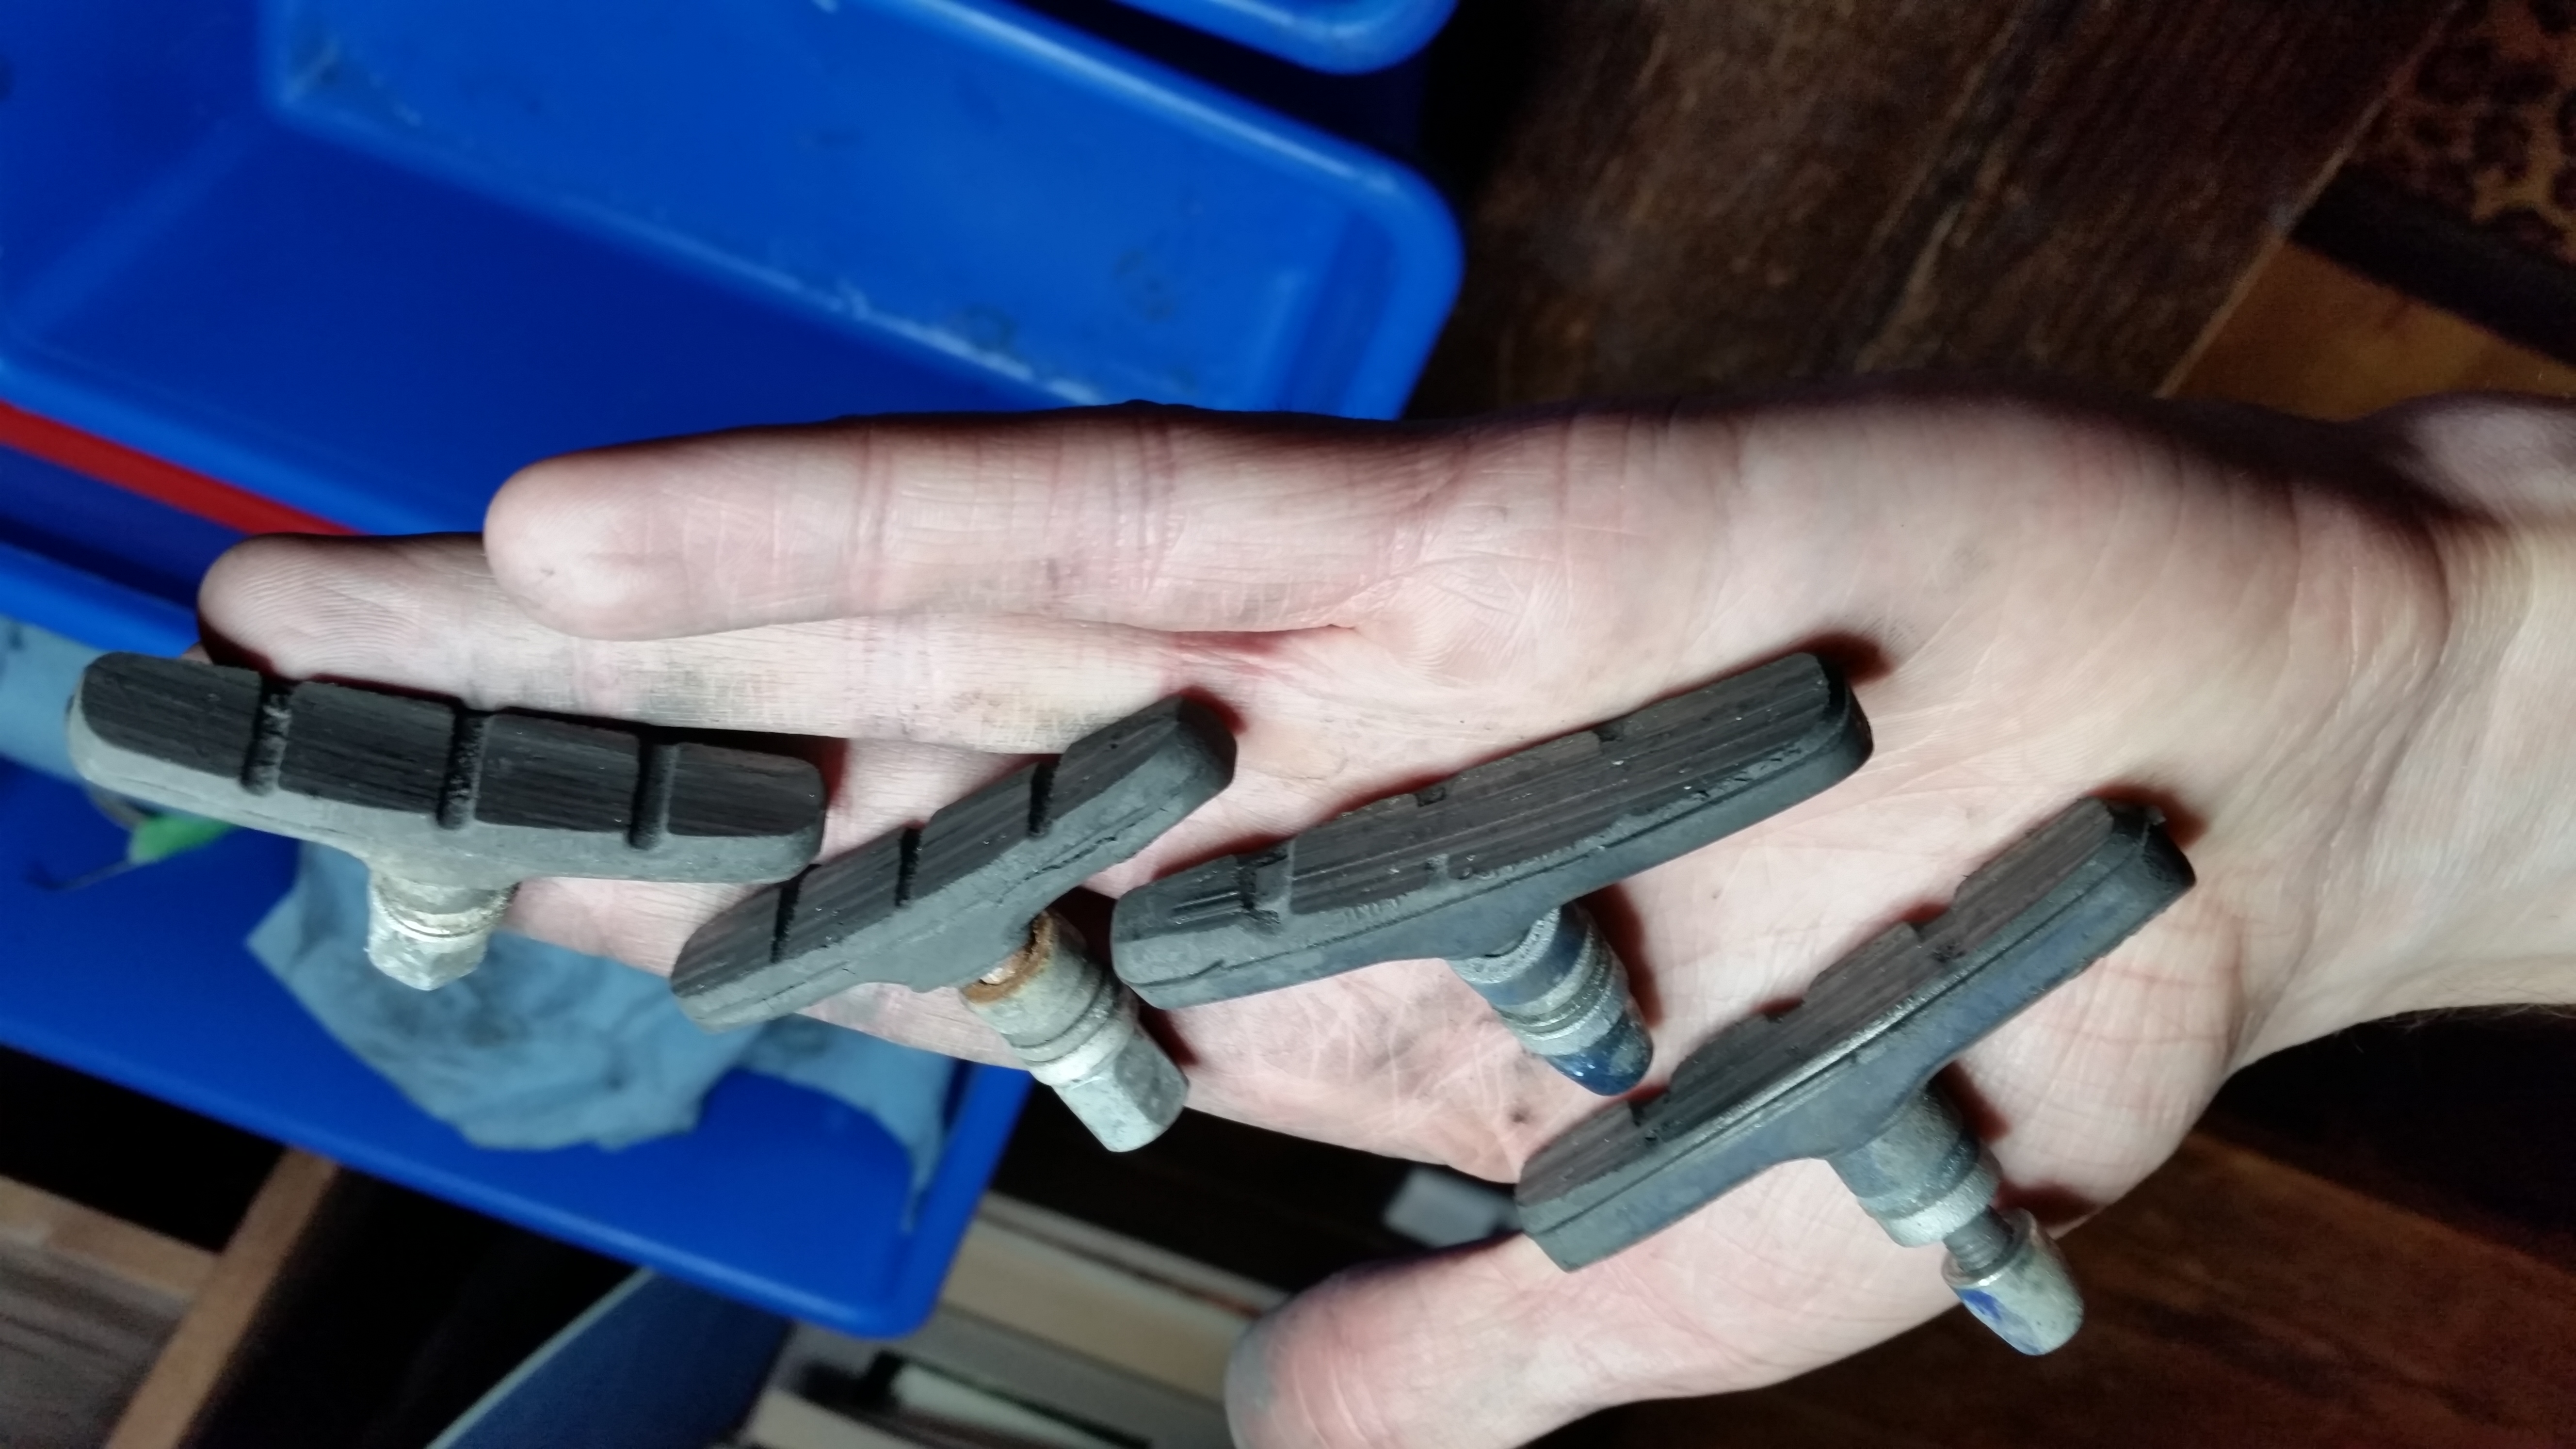
By the end of the season, my brakes were so worn they were no longer reliable. I decided it was time to rebuild my regular bike when my brakes didn’t give me enough stopping power and I nearly plowed into the back of a car downtown. It turns out that the road salt and grit and moisture is a HUGE factor in brake wear. This is probably the best argument for disc brakes in winter.
After disassembly, I sorted the parts into plastic tubs, and used the garden hose and some old rags (from cut-up clothing) to get rid of the worst of the road grit buildup. Then I cataloged the pieces of the bike so it would be easy to store and rebuild next year.

This lovely little bike is now sitting disassembled in my closet, until next winter. Maybe one day I’ll have the space to keep it assembled all year round, but for now I don’t mind the hassle.
This was a fun adventure, and I’m very pleased to be able to continue riding year-round from now on.